LOOPYMIX SUITE
A FUNNY AND EASY TO USE MUSIC CREATION TOOL SUITE
What is LoopyMix Suite ?
LoopyMix Suite aims to be used for:
- Melody loop design (by using the Loop Builder component)
- Melody loop extraction and matching for uses at a defined BPM rate in the LoopyMix GUI Arranger
- Track building and mixing on the LoopyMix GUI Arranger
Furthermore additionnal (console based) tools are available for special operations on the loops (loop
adjustment/cut, time shifting for synchronization with the beat, wav file format conversion, sample
conversion at 315Sps/BPM for compatibility with e-Jay(TM)-like arrangers...).
This set of tools does not include any classical type audio editor. The complementary use of an audio
editor able to edit wav files, perform cuts, fade in/out and special effects (e.g. Audacity available
in full install RPM package) is strongly recommended to pre-process or post-process sample loops (detailed
further).
The basic LoopyMix Suite components
1 - LOOPYMIX GUI
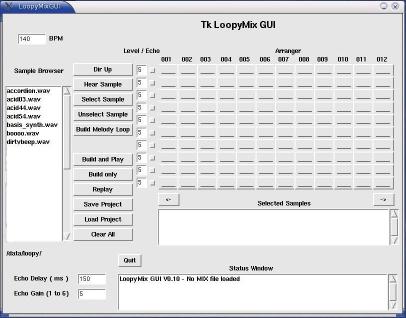
This application is the grapical user interface (GUI) for the 'loopymix' executable file. Calling 'loopygui'
under console simply opens this main window which will allow you to control the most part of the LoopyMix
Suite in a easy way (even if not knowing what are the called components).

The left selection list is used to browse the available loop samples. The big table area is the track editing
area. Just under this track editing area is the selected sample list box, and the lower output text box gives
back information about the processed operations.
Basic operations for building a mix are the following:
First of all, the required BPM rate must be selected before starting anything, because every further sample
import will make the arranger apply the eventual tempo correction on the samples according to the pending BPM
rate !
Before selecting the samples that you will use, browse the sample files and click "Hear Sample" to make the
selected sample play.
When you decide to use the sample inside your mix, click "Select Sample" to make it appear inside the
selected sample list box, as show hereunder:
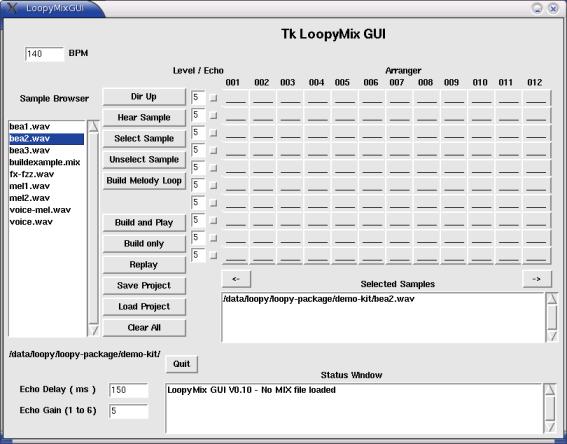
You can select up to 40 samples. It still be possible to add samples even after having begun to build the mix
but unselecting samples is only possible while nothing has been already placed onto the tracks.
When selecting samples the following message might appear if required:

That means that the sample file is not corresponding to an exact loop pattern for a use at the required BPM
rate. If this sample is actually intended to be used as a loop, it must be converted ("Match") to fit
correctly in the mix (otherwise a total mis-synchronization with the tempo and sound drops will be heard !).
However, if the sample is simply a sound (e.g special effect, "sphere", voice etc...) that does not need to
be synchronized but only played from time to time within the mix, just click "Ignore" to prevent the arranger
from making any conversion. In some cases where a conversion is required, the operation might be denied if
the sample is much too short or much too long. In that case that simply means that the sample is not suitable
for this use. When the matching operates properly, the converted sample file "F"<sourcename> is
generated and added in the selection list instead of the original one (which is not overwritten).
Once you decide to start placing the loops on the available tracks, select the sample to be used in the selected sample
list box, then click on the track part where you want it to begin. You can place it any times you want within
the track array. Depending on the sample length, one or several patterns will appear as filled when the sample
is placed. To delete a sample placement just re-click on it onto the track.

2 - BUILDING YOUR OWN MELODY LOOPS (called via LoopyMix GUI)
Whatever you already processed in the LoopyMix GUI, you can use at any time the melody loop builder by clicking
"Build melody loop" to access this window ("melobuild" that can be called too directly under console):

Building a sample pattern with a length up to 2 bars (8 tempo beats) is possible. If the second half of the
pattern includes only silence, the generated sample will automatically be one bar long.
In this example, the "A-tuned" sample "tioooio.wav" has been used to design our melody loop (it can be heard
by clicking "Hear Sample" and then selected as in the Arranger). "A-tuned" means that this single tone
instrument sound has been recorded playing the note "A", sampled at 44100Hz. Therefore samples available in
the directory having this name are intended for that purpose (not to be loaded as loops in the arranger !).
Generally, having this source sample with a length at least as long as the longest required continuous note to
be played is recommended. However, if this conditon is not fulfilled, the melody builder (driving the
"samplayer" command line executable) will deal with this issue. In that case the result will sound correct
only if the sample is really "A-tuned" and does not have a ridiculous length compare to the required playing
duration (e.g one tenth !).
If always considering the example, the melody loop that has been composed here (begining of a famous children
song) features:
- Three times a short note "C", ending by a short clean damping (cut marks)
- One time the note "D" in the same conditions
- One long (4 fourth of beat period) continuous note "E", ending in the same way
- One similar long "D".
We could have made the long "E" longer, for example until a direct transition is made to the long "D", without
placing a cut mark at this transition.
Once the loop has to be heard, just click "Build n'Play". This will simultaneously create a sample file under
the following name: <sourcefile_without extension>-mel.wav. In our example that will give: tioooio-mel.wav.
You can change, correct and replay the melody loop as many times as you want (the file will be updated
accordingly).
Note: Do not forget to select the BPM rate corresponding to the one you planned in the target mix ! (although
a conversion would be possible but this would be a useless loss of quality !)
Once your loop is ready to be used, just go back to the LoopyMix GUI main window by clicking "Quit". If several
melody loops are planned using the same source A-tuned sample, do rename your result files (from your file
browser or from the console) to avoid any unwanted overwriting !
Once you are back to the LoopyMix GUI, the newly created loops will appear inside the sample browser. You can
select them and use them as already described before.
3 - LAUNCHING THE FULL MIX BUILD
During composition, each time that the result of a track edition has to be heard, the button "Build and Play"
must be used. This has three effects:
- Generating the temporary mix definition script file (purpose detailed further).
- Generating the temporary audio wav file.
- Playing this audio file resulting from the composed mix.
Therefore when clicking "Build and Play", a few seconds delay might be perceived before the playing starts.
(Time needed to build the mix). To listen several times to the same mix, just click "Replay" once the build
have been done one time, so that no more delay will occur.
4 - SAVING THE PROJECT
When the work has to be saved, clicking the button "Save Project" will make a small dialog appear, asking for
the project name. After the name has been entered, the project is saved to disk via this two files:
<projectname>.mix = the mix definition script, mandatory for any re-editing.
<projectname>.wav = the audio file containing the full song (can be used, converted, deleted...)
To reload later an already existing project, just select the ".mix" file in the sample browser and click on
"Load Project".
5 - DETAILS ABOUT THE ARRANGER FEATURES
Each track playback volume level has to be adjusted separately via the input fiels located under "Level". The
volume level can vary from 1 to 9.
For each track an individual echo activation check box is available (just close to the level input fields).
Enabling one track check box will activate the echo only for this track, according to the settings entered in
the following fields (applying for all the echo activated tracks):
- Echo delay is expressed in milliseconds, and can vary from 30ms to 1000ms.
- Echo gain is the echo decay factor (feedback attenuation) expressed by an integer value beeween 1 and 6.
Under the track edition array (arranger) the left and right arrows allow to explore the mix forward and
backward for editing.
Since Release 1.00, a partial playing of the displayed mix part can be performed via a new button. Furthermore
the playing can now be stopped at any moment.
6 - BASIC RECOMMENDATIONS
When adding samples on new tracks, do not leave blank tracks beetween your different useful tracks. This will
spare computing time during the build.
Prefer the use of normalized samples for your mixes. Although LoopyMix deals with not normalized samples, the
audio quality will be better when using already normalized loop samples.
If one track is played at a too low volume level, even with the level set at 9, decrease the level of all the
other tracks until getting the correct balance. This will not lower the overall volume level, since the level
settings are relative. (The overall level is automatically adjusted to get the best dynamic range).
To start a new mix from scratch when a mix has already been edited, use "Clear All" instead of deleting the
samples along the tracks. This will not only simplify your task but will also save used memory and computing
time.
For a further edition of a saved project, keep note of the BPM rate that was used for the mix because this
parameter is not saved in the ".mix" file ! (might be in further versions).
7 - USING DIRECTLY THE COMMAND LINE EXECUTABLE FILES UNDER CONSOLE
For details about the use of loopymix, just edit a ".mix" file and read the comment lines.
Loopymix is
called under console as follows:
loopymix <mixname> <BPM rate> (the BPM rate is 140 by default if nothing is specified).
For details about the use of "samplayer" (used by "melobuild") and "tempofitter" (used by the arranger for
sample conversion), refer to console-apps.txt.
Additional Tools
Additional console based tools are provided with the LoopyMix Suite. This tools might be helpful in case of
use of some roughly adjusted loops (e.g. recorded, cut, extracted from an existing song). After a loop
extraction done in an audio editor, the exact cutting and time shifting will be possible to get it perfectly
adapted for your mix.
The additional tool set includes:
1 - LoopFixer
Called simply by typing "loopfixer" under console, this very basic programm has a text based user interface.
Its purpose is adjusting exactly the cut of an extracted loop (initially cut with a length margin) to get it
looping without any tempo jump nor drop-out. It still be possible to adjust the target length as many times
as required and hearing the sample looping to check the result. When the operation is successful, saving the
adjusted loop under "F"<sourcefile> can simply be done by requesting a save before quit. For details
about the use of LoopFixer refer to console-apps.txt.
2 - LoopShifter
The user interface is very similar to the previous one. Before accessing the main menu, you must enter the
reference tempo file name (sample at the target BPM !). Note that the loop which has to be time shifted must
have already been correctly cut and converted (if not native at the target BPM) with tempofitter ! Then, after
having loaded the reference tempo and the sample to be processed, making both loops playing at the same time
will help you for a correct time shifting (delay or advance applied to the processed loop to get it in phase
with the reference tempo).For details about the use of LoopFixer refer to
console-apps.txt.
3 - BackFitter
The only purpose of this small tool is the pitch conversion of sample loops to get them compatible with other
arrangers working at a constant loop length. (Not really featuring an adaptative BPM rate but only a sample rate
change at the mix playback). Backfitter will convert the source sample to 315Hz/BPM so that it can be handled as
an exact number of bars in "e-Jay"-like arrangers (see links below for details). This is equivalent to changing
the pitch to get the loop fit for 140 BPM at a 44100Hz sample rate, but with a shifted tone. BackFitter is
called as a command line command with the same syntax as TempoFitter (except the BPM rate parameter which must
not be specified).
4 - WavForCD
This small utility is not especially related to the LoopyMix Suite but might occasionnaly be helpfull to make
wave files compliant to the standard format (44100Hz Stereo). WavForCD does not process 8 bit wave files. Its
name was due to the first purpose that it had for me: converting wave files to get them directly usable by
cdrecord for CD burning. Its usage is simple:
"wavforcd <sourcename>".
There is no support and no planned evolution for this executable which is just provided as a "bonus file" that
might help...
Related Links
Free and quality WAV samples at DORU MALAIA WORLD
Quite good too at Platinum Loops
Some WAV samples and some similar tools running under windows (related to the "e-Jay" suite) at
Audiofool
Tk package (required for use of the LoopyMix GUI) at sourceforge.net
but already included in the main Linux distros.
Demo samples
This first example illustrates what can be obtained with the melody builder, by using
a simple "A-tuned" sample.
This second example is what will result from a build done after having loaded
the demo ".mix" file (included in the package, as well as the loop samples). The previous example is used as a
loop inside this demo mix.
Download the LoopyMix Suite package
This LoopyMix archive contains the source files as well as
the demo kit (loop samples and a demo mix file to be loaded and built in the LoopyMix GUI).
NEW: The latest additional tools for creating:
* A-tuned samples (instrument sounds): A-Tuned Sound Generator
* Enhanced modified instrument sounds and loops: Easy-FX
(Both available via the same link).